Handout on "Hamburger Experiment" rev. 09/28/2008
Learning objectives:
1. Hamburger is a good nutrient source for bacteria. (What is hamburger made of? What nutrients are present for bacteria to use?
2. Hamburger is a source of bacteria. Bacteria are introduced to the meat during slaughtering and processing, and during grinding are spread throughout the meat.
3. Bacteria can grow when suitable physical conditions exist and nutrients are present, thus hamburger must be refrigerated to slow their growth.
4. Certain types of normally mesophilic bacteria can still grow in the refrigerator and are called psychrotrophs. Because of this, hamburger has a "last sale date" because it will eventually spoil.
5. Given an abundant supply of nutrients and constant conditions, bacteria will double at regular intervals. The length of time in which a population doubles is called the Generation Time, and this can be determined from a log graph of bacterial growth.
6. The number of viable bacteria in a sample can be determined using the plate count technique.
7. Bacteria are often present in numbers too high to count without performing dilutions; the starting numbers of bacteria can then be calculated using the dilution factor.
8. Experimental Overview: the numbers of bacteria in hamburger samples incubated at room temperature will be graphed against the length of time of the room temperature incubation. We hypothesize that the growth pattern observed from graphing the data will be consistent with exponential growth.
Introduction
A sample of hamburger has been maintained at 4EC (refrigerator) since its recent purchase. At intervals, samples were removed and allowed to stand at room temperature (about 22EC) until used in the experiment. The table below shows when the samples were placed at room temperature.
To determine the rate at which the bacteria in the hamburger double, groups of students (5 groups in the morning class, 3 in the afternoon) will determine the number of bacteria in these different samples. Taken as a whole, these data will show the changes in numbers of bacteria in the hamburger the longer the samples were at room temperature. Counting the number of bacteria will be done using viable plate counts where bacteria are added to the agar and allowed to grow. After colonies on the plate have had two days to grow, the number of colonies on the plates will be recorded and the class data will be pooled. A lab report will be written on this exercise.
Assignment of students to hamburger samples:
|
Sample time: |
Saturday 6:30 pm |
Saturday 9:30 pm |
Sunday 7:30 am |
Sunday 1:30 pm | Sunday 9:30 pm | Monday 9:30 am |
|
Morning |
XXXXX | |||||
|
Afternoon |
XXXXX | XXXXX | XXXXX |
The "Sample time" is labeled as the time that hamburger sample was moved from refrigerator to room temperature. The X-ed out boxes represent samples that are not used. "Morning" and "Afternoon" indicate which class will use that sample.
Calculate and fill in the number of hours each sample will have been incubated at room temperature. Use 9:30 am and 2:30 pm for the times at which the samples will actually be used in the morning and afternoon classes, respectively.
Procedure
1. Gathering your supplies.
Obtain the following:
Either 4 or 6 "dilution blanks" (pushcap tubes containing 9.9 ml of sterile water); see below.
8 empty, sterile Petri plates.
A Pi-pump and a 1 ml sterile pipet
A micropipettor set for 100 Fl and a box of sterile pipet tips.
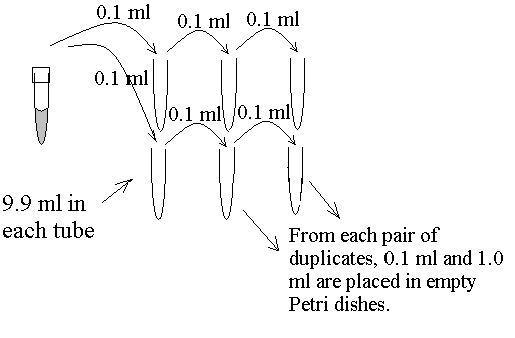
If your sample was removed Monday morning, you will need only 4 dilution blanks, otherwise you will need 6. You will need to label your Petri plates (on the bottom). Each plate needs to be labeled with your initials and some code that indicates how much the hamburger sample was diluted. For each sample you will make at least two serial 1:100 dilutions in duplicate and use the two most diluted pairs of tubes. I suggest using a code such as A1, A2, B1, B2 etc. Keep careful notes in a note book or on this sheet, writing down which sample you used and which plates represent the most concentrated and which are most dilute.
2. Performing the experiment.
Wearing disposable gloves, weigh out 4.0 grams hamburger from your assigned sample in a clean plastic weighing boat on the triple beam balance. Place this sample into the blender along with 156 ml of sterile water, measured by pouring out of a large flask into a sterile graduated cylinder. How big a dilution is this? ________ Blend the sample for 2 minutes.
Now you will perform "serial dilutions" in duplicate. In a serial dilution, you perform the same size dilution to several tubes each time taking a sample out of the tube you just diluted into. Line up your dilution blanks in pairs. Using the 100 Fl pipettor, carefully remove 0.1 ml (100 Fl) of "hamburger juice" and add it to the first dilution blank, then add a second 0.1 ml of hamburger juice to a second dilution blank (all dilutions will be made in duplicate). Let the TA know as soon as you have removed your duplicate samples from the hamburger juice so the blender can be cleaned for another group to use.
After adding your hamburger juice to the first pair of tubes, mix your tubes very well. Discard your pipet tip and use another for the rest of your dilutions. Carefully remove 0.1 ml from each of the 2 tubes and add these to the next two tubes. Again, mix these tubes very well, then rinse your pipet tip with the liquid in these tubes by pipetting up and down a couple of times. Then use your pipettor to remove 0.1 ml from each these tubes to add to the final pair of tubes (if your sample calls for a third set of tubes). Mix these very well and discard the tip.
Now that the bacteria from your hamburger are all diluted in 3 pairs of tubes, you take samples from the dilutions to determine the number of bacteria. You will use a clean sterile 1 ml pipette. If you will start with the most diluted samples first you can use the same pipet for all your samples. Remove 0.1 ml from each duplicate and place each 0.1 ml sample into a different empty Petri plate. Be sure the plates are right side up (!) and you use good aseptic technique. Then, from the same pair of tubes, remove 1.0 ml from each and put each into empty plates. Now move to the next pair of tubes which are less dilute. Again, remove 0.1 ml from each pair and pipet that into empty plates, then do the same using 1.0 ml. Now you should have 8 plates, four with 0.1 ml and four with 1.0 ml.
Go to the big water bath and obtain a flask of melted Plate Count Agar. Swirl the agar around in the flask to make sure that the melted agar is well mixed with the broth. To make sure you do not contaminate the agar as you are pouring it into your plates, you must dry off the outside of the flask and use a Bunsen burner to briefly flame the lip of the flask just before pouring. Working together, pour about 20 ml of melted agar into each plate and gently swirl each one 10 times in a figure eight pattern to be sure the bacteria are evenly spread throughout the agar. Your instructor will show you how to pour and mix plates. When you are finished with the agar, if there is any left, pass it on to another group or return it to the water bath. If it is left at room temperature, the agar will gel! After your plates have been poured and mixed, allow them to harden undisturbed, at least 10 minutes. Once they have solidified, they will be incubated for a couple of days, then you can count the number of colonies on each plate.
After two days of growth, bacteria will have formed colonies in and on top of the agar. Using the colony counter (light and magnifier) and colony enumerator (clicky-thingie), count all the colonies that you see on the plate. Some may be rather small, but if you are pretty sure they are not dust, count them. If the plate is going to have over 300 colonies, you may quit counting. Even though numbers of colonies over 200 will not be used, you should try and count any plates with anywhere from 1 to 250 colonies.
Theory
In a viable plate count, only bacteria that are alive will be counted. Individual bacteria are too small to see, but if they are alive they will multiply until there are millions in one place and we can see them: a colony. So every colony you see may contain many thousands of bacteria but represents the growth of just one original cell. (Because we don’t really know if it was just one cell or two or a small group that formed the colony, it is more technically correct to refer to "colony forming units", abbreviated CFU). Generally (and your instructor will tell you if the rules will be bent) we only use data from plates that have between 20 and 200 colonies. Fewer colonies increase the error in the data too much (if there are 20 colonies on the plate and you miss just one and count 19, your numbers are off by 5%, and the fewer colonies there are, the greater the error). Too many colonies cause counting errors (it’s easier to miss them, some may be on top of each other, and competition between bacteria on a crowded plate may cause some not to grow).
It’s very important to remember that each and every plate your group made represents the same number, the number of bacteria in the hamburger sample you used! It’s just that because the sample was diluted a different number of times, the number of colonies on the plates are different. We dilute the sample only to get a number of colonies between 20 and 200 so we can reliably count how many bacteria there were in the hamburger. The plates with too many or too few bacteria to count aren’t usable, but that’s OK as long as one or two of the dilutions ARE usable.
Diagram of dilutions: